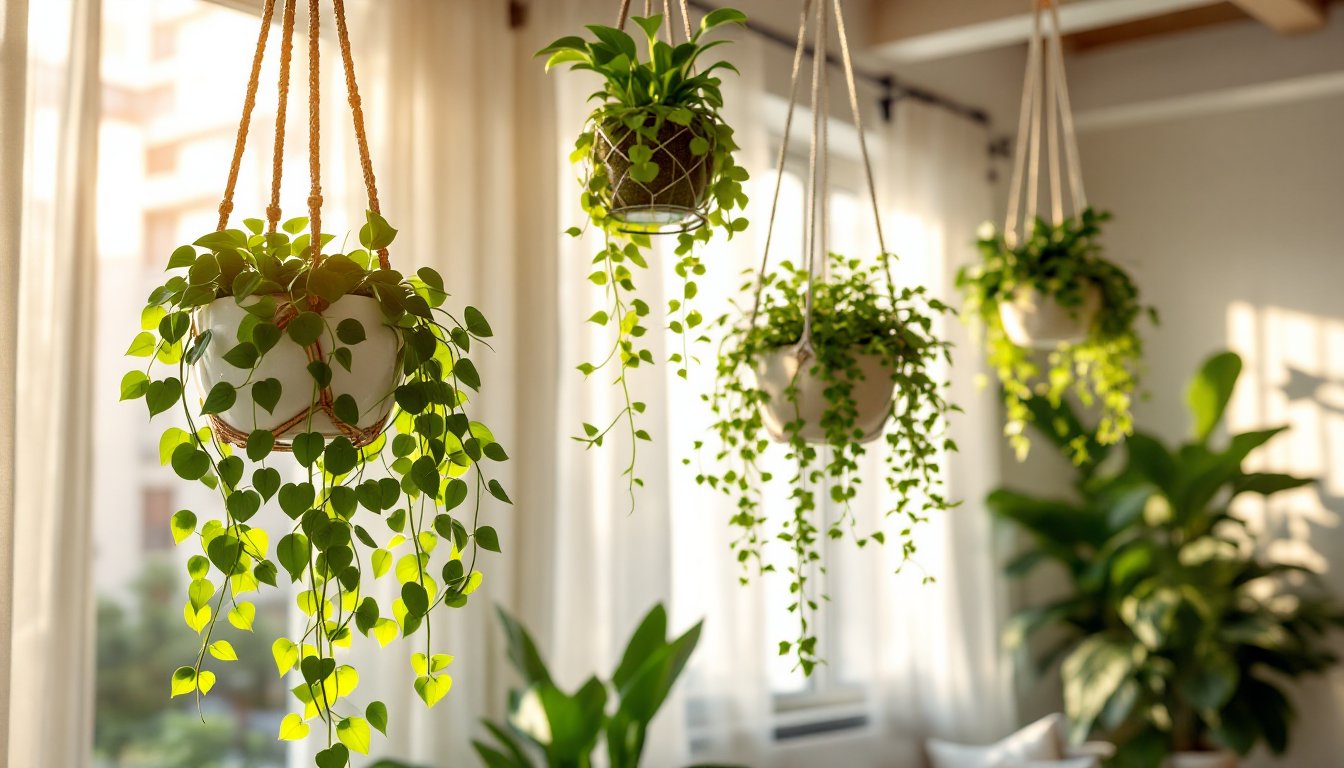
Hanging planters have become a go-to solution for homeowners who want to maximize indoor plant displays without eating up floor space. Whether you’re working with a compact apartment, a sunny kitchen nook, or a living room corner, indoor hanging baskets for plants offer flexibility and visual impact that traditional potting can’t match. They’re practical for trailing plants like pothos and string of pearls, stylish enough to complement any décor, and surprisingly simple to install correctly. This guide walks you through choosing, installing, and maintaining hanging planters so your green space thrives year-round.
Table of Contents
ToggleKey Takeaways
- Hanging planters maximize indoor plant displays by using vertical space, allowing you to fit dozens of plants in a small room without cluttering floor surfaces.
- Hanging planters for indoor plants come in multiple materials—macramé, fabric, metal, and plastic—each with distinct advantages for moisture tolerance, durability, and aesthetic appeal.
- Proper installation on ceiling joists or wall studs is critical for safety; use lag bolts rated for at least 50 pounds and always verify weight capacity before hanging your planter.
- Water hanging plants when the top inch of soil feels dry, and use well-draining potting mix with perlite to prevent overwatering, the leading cause of plant failure.
- Rotate planters monthly and fertilize during growing season to ensure even light exposure and provide necessary nutrients that outdoor soil would naturally supply.
Why Hanging Planters Are Perfect for Indoor Plant Lovers
Hanging planters solve one of the biggest challenges indoor gardeners face: space constraints. By using vertical real estate, walls, ceilings, and window frames, you multiply your growing area without cramping your living space. A 100-square-foot room suddenly accommodates dozens of plants instead of a handful scattered on shelves.
Beyond function, there’s genuine aesthetic value. Trailing plants like pothos, string of pearls, and philodendrons naturally cascade downward, creating lush layers that transform a bare corner into a focal point. This vertical greenery also improves air quality by increasing the surface area for plants to absorb carbon dioxide and release oxygen.
From a practical standpoint, hanging planters keep foliage off pet-accessible surfaces and away from water-damaged furniture legs. They’re easier to rotate for even light exposure and simplify watering routines because excess water drains freely without pooling on hardwood floors. For renters and homeowners alike, they’re a low-commitment way to experiment with different plant types before committing to permanent installation.
Types of Hanging Planters and What Works Best
Not all hanging planters are created equal. Your choice affects everything from plant health to installation difficulty and maintenance habits. Understanding the main categories helps you match the right planter to your space and skill level.
Macramé and Fabric Hangers
Macramé hangers dominate the bohemian and eclectic interior design space. Hand-knotted cotton or hemp cord cradles the pot at multiple points, distributing weight evenly while adding soft, organic texture. They work beautifully with ceramic or terracotta pots in 6- to 10-inch diameters. The main drawback: macramé absorbs water, especially near the knots, which can weaken fibers over time if planters are watered heavily. Choose a quick-draining potting mix and water carefully to avoid saturation.
Fabric slings made from canvas or recycled materials offer a modern alternative. These are durable, washable, and often support pots up to 12 inches across. They dry faster than macramé and suit minimalist or Scandinavian décor.
Metal and Wire Planters
Metal hanging planters, especially those made from powder-coated steel or aluminum, handle moisture without degradation. They’re ideal for bathrooms, kitchens, or humid spaces where fabric would rot. Wire cage planters (often paired with moss or coir liners) provide excellent drainage and a modern industrial look. Cast iron hangers are sturdy but heavy: reserve them for secure ceiling joists or wall studs rated to support their weight plus a saturated pot.
Plastic hanging baskets are lightweight and affordable, making them beginner-friendly. They won’t rust or rot, though they can become brittle in direct sunlight. Most are designed with drainage holes and saucers to catch runoff, reducing water damage to ceilings and floors.
How to Choose the Right Hanging Planter for Your Space
Start with the plant, not the planter. Different trailing varieties have different root systems, growth rates, and watering needs. String of pearls (Senecio rowleyanus) prefers shallow, quick-draining containers and dry-side care, plastic or terracotta works well. Pothos (Epipremnum aureum) tolerates a wider range of pot sizes and materials but hates standing water, so ensure drainage holes are unobstructed. Tradescantia (spiderwort) grows aggressively and benefits from slightly larger planters with rich soil.
Second, assess your installation surface. If hanging from a ceiling, locate ceiling joists or studs using a stud finder, never rely on drywall alone to support a planter heavier than 5 pounds when saturated. Wall-mounted planters need studs (typically spaced 16 inches apart in modern homes): a toggle bolt or heavy-duty anchor works for non-stud locations but only up to about 15 pounds depending on the product. Window-mounted planters can use suction cups for lighter loads (under 3 pounds) but should transition to bracketed hardware for anything heavier.
Third, consider light and humidity. A north-facing corner with low indirect light suits low-light tolerant plants like devil’s ivy or prayer plant. South and west windows provide bright indirect light ideal for peperomia, echeveria, or string of pearls. Bathrooms naturally offer high humidity: choose plants that appreciate moisture and planters that won’t degrade quickly (metal, plastic, or sealed ceramic).
Finally, match planter aesthetics to your décor without sacrificing function. Natural materials like cork and stoneware create earthy, warm interiors, pair these with soft macramé or fabric hangers. Industrial or minimalist spaces lean toward sleek metal or geometric ceramic planters with simple rope or wire hardware. The best planter is one you’ll actually use, so choose something that appeals to you visually and feels manageable in terms of weight and maintenance.
Installation and Safety Essentials
Improper installation is the leading cause of planter damage, water stains, and even ceiling collapse. Take five minutes upfront to do this right.
For ceiling hangers:
- Locate ceiling joists or studs using a stud finder. Mark the location with a pencil.
- Drill a pilot hole perpendicular to the joist using a 3/16-inch drill bit (smaller than your final hardware).
- Install a lag bolt (½-inch diameter, 3-inch length minimum) or joist hanger rated for at least 50 pounds. Tighten firmly but don’t over-torque, which can strip threads.
- Attach an S-hook or eye bolt to the lag bolt, then connect your planter’s hanging hardware.
- Test the setup by applying downward pressure before hanging a plant. If the ceiling flexes, the anchor is undersized or misplaced.
For walls:
- Find a wall stud (typically 16 inches on-center in North American construction).
- Drill a pilot hole into the stud and screw in a ½-inch wood screw or lag bolt rated for your planter’s weight.
- If no stud is available, use heavy-duty toggle bolts or expandable anchors rated for drywall, but limit loads to 15 pounds.
- Always double-check the weight of your planter plus saturated soil, a 10-inch ceramic pot filled with moist potting mix easily weighs 8 to 12 pounds.
Drip Prevention:
Install a saucer or drip tray under any hanging planter, especially indoors. Even small overwatering mistakes create water rings on ceilings or stains on furniture below. Tiered or stacked trays catch secondary runoff. Alternatively, use a planter with a built-in saucer or line fabric hangers with plastic nursery pots to contain drainage.
Safety Warnings:
Wear safety glasses when drilling overhead. Always use the correct fasteners for your surface, drywall anchors in wood, lag bolts in joists, and expansion anchors in concrete. Never assume previous installations are safe: verify all hardware before hanging anything. If your home has plaster walls or historic construction, consider consulting a professional before drilling.
Planters made from natural fibers like jute or cotton gradually degrade when exposed to constant moisture. Inspect macramé hangers every 3-4 months for fraying or weakening strands. Replace them when fibers show visible wear, not when they fail catastrophically.
Caring for Your Hanging Indoor Plants
Hanging planters present unique watering and nutrient challenges because water drains faster, especially in fabric or mesh containers. The higher air circulation around hanging plants also accelerates evaporation.
Watering Strategy:
Check soil moisture daily by inserting a finger 1 to 2 inches into the soil. Water when the top inch feels dry to the touch, most trailing houseplants prefer this “dry between waterings” approach. In summer, you may need to water twice weekly: in winter, every 10-14 days often suffices. Overwatering is the top killer of indoor hanging plants, so err on the side of underwatering slightly.
Use room-temperature water and pour slowly into the soil, not the crown of the plant, to avoid rot. Allow excess to drain freely into your saucer or tray. Empty saucers after 30 minutes to prevent root rot.
Potting Mix:
Use a lightweight, well-draining indoor potting mix (not garden soil). Add perlite or orchid bark to standard potting soil to improve drainage, a ratio of 2 parts potting mix to 1 part amendment works well. Heavy soils compact in hanging containers and trap moisture around roots. Repot your plants every 12-18 months or when roots emerge from drainage holes.
Fertilizing and Light:
Hanging plants in indoor settings don’t have access to the nutrient cycling of outdoor soil. Feed with a balanced liquid fertilizer (10-10-10 NPK ratio) every 4-6 weeks during the growing season (spring and summer). Cut back to every 8-10 weeks in fall and winter when growth slows. Rotate your planters monthly to ensure even light exposure on all sides, trailing stems naturally grow toward light, creating lopsided plants if light comes from only one direction. Move planters away from heating vents in winter: dry heat stresses foliage and attracts spider mites.
Pruning and Maintenance:
Trim dead or yellowed stems promptly to redirect energy to healthy growth. Pinch back growing tips every few weeks to encourage bushier, fuller plants. Wipe leaves with a damp cloth monthly to remove dust and improve photosynthesis. Watch for pests, spider mites, mealybugs, and scale insects hide in leaf joints and under trailing stems where humidity is high. Spray infested plants with insecticidal soap or a mixture of water and mild dish soap, repeating every 7-10 days if needed.